


How to Create Snow Material in Maya?
In this article, Fox Renderfarm, the industry's leading cloud rendering service provider and render farm, will bring you a Maya tutorial about how to create snow material in Maya.
Step 1. Create an aistandsurface material.

Step 2. Add two parallel lights and render.

Step 3. Connect a displacementShader.

Step 4. Connect a Fractal node to the displacementShader and give Displacement a value (here 0.2).

Step 5. Find subdivision, and change Type to catclark. Set Iterations a bit larger (4 here).

Step 6. Adjust the Amplitude, Ratio and Frequency Ratio parameters on the Fractal property appropriately to match the effect of Displacement.
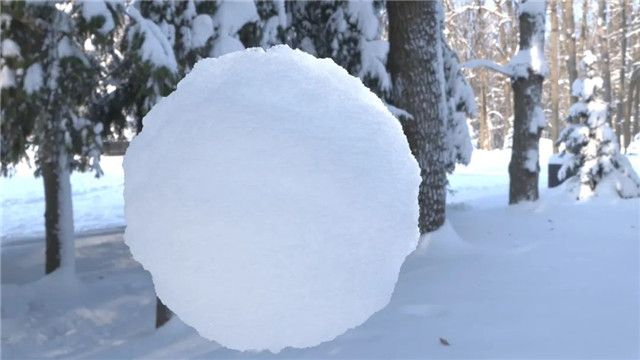
In the first layer of Fractal, we mainly handle the large undulating silhouette of the snowball.

Step 7. Add aiMixShader, and also raise Roughness.

Step 8. Connect the first layer Fractal node to the input interface Shader1 on the aiMixShader and change the blend mode to Add.

Step 9. Create a second Fractal node to connect to the aiMixShader input interface Shader2 and adjust the parameters. Create details of the grain undulations on the snow surface through the second Fractal layer.

Step 10. Go back to the aiStandardSurface material sphere, adjust the IOR to 1.330 and turn on Substance.

Step 11. Add HDR and render for testing.

Step 12. On the surface of the snow there should also be some tiny dots of high-gloss crystals, which can be created using Coat.

Step 13. Adjust the angle of the parallel light and set the Intensity to 6. Gives highlights to the edges of the sphere. Make the whole sphere more three-dimensional (highlights, shadows and reflections) and translucent (subsurface scattering).

Step 14. Improve the render quality and make the final render.

Author: Ji Wei